Smudged background. How to blur background in photoshop
16.02.2015 27.01.2018
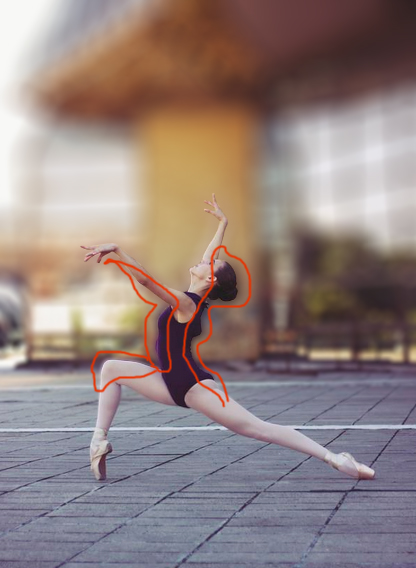
Open the photo in Photoshop. I'll show you how to blur the background behind this girl, and not all of it, but in some places to make it beautiful effect. You can blur your own photo in the same way. The main thing is to select an object that remains in its sharpness. And allocate to the conscience.
Use the Polygonal Lasso Tool to select the object.
.jpg)
Press CTRL + J - this action will automatically cut what you have selected and place it on a separate new layer. It will be a girl.
Go back to the photo layer and make a copy of it by pressing CTRL+J.
.jpg)
Apply to this copy Filter – Blur – Tilt Offset (Filter – Blur – Tilt-Shift).
Here you can adjust the settings as you wish. Where there is a circle, the place remains sharp. The lines indicate the scope of the background blur, you can move them as you like and even tilt them. You can also adjust the blur strength - for this there is a regulator strip in the circle.
.jpg)
Click OK when done and the background will be blurry.
.jpg)
What is the problem here? If you look closely, you will see that the outline around the girl is nothing more than a girl blurred behind. It is clear that this does not happen in life, and hence it is clear that Photoshop was used as a processing tool in the photo. Our task is to get rid of this jamb.
How this problem is solved in one of the possible ways.
Delete this blurred background layer - we won't need it. You should have two layers - one with the girl, the other - the whole photo. Click with CTRL pressed on the layer with the girl - this way you will get a selection.
.jpg)
Go to the photo layer, and for now turn off the girl layer from visibility (click on the eye opposite the girl layer).
The selection will remain. Press DEL on your keyboard to delete the selection on the photo. Press CTRL+D to deselect. We removed the girl, so in her place there will be an empty image - a white background.
.jpg)
Our task is to paint over this place. For this I used the Clone Tool. I tried to draw it as if the girl was not in the photo, although it’s not necessary to try hard, the main thing is that the shades of the colors in the area being painted over coincide with those lying nearby - that’s the whole point.
.jpg)
Now turn on the layer with the girl in visibility, and blur the background with the same filter as we did before. Now the result is quite different. In this case, only the background behind is really blurred, and not the background with the girl. It is much more pleasant to look at and the work looks much better.
.jpg)
In this photo, I'll show an example of a completely blurred background. Just apply the Gaussian Blur filter. This effect is also in fashion now, because it looks gorgeous. The technique is the same, only a different filter is applied.
.jpg)
The only problem that may arise here is how to select such complex parts of the image as hair. For this, I have a special free video course -.
Such a blurred background is perfect for inscriptions.
.jpg)
You can blur the background in photos in specialized graphic editors without any restrictions. But if you need to make a quick blur, then it is not necessary to install any additional software, as you can use online services.
Because it's not professional. software to work with graphics, here you can find various restrictions on the photo. For example, it should not be larger than any size. The online service also does not guarantee high-quality blur background. However, if there is nothing complicated in the picture, then you should not have any problems.
It should be understood that using online services, you will not be able to get the perfect background blur, most likely, those details that should be clear will also suffer. For professional image processing, it is recommended to use professional software such as Adobe Photoshop.
Method 1: Canva
This online service is completely in Russian, has a simple and intuitive interface. In addition to applying blur, you can add sharpness to the photo, make primitive color correction, and also use various additional tools. The site has both paid and free functionality, but most features are free. Canva requires registration or social media login.
To make adjustments to the image, use this instruction:
- Go to . You will find yourself on the registration page, without which you will not be able to process the photo. Fortunately, the whole procedure is done in a couple of clicks. In the form, you can choose the registration option - login through your Google + or Facebook accounts. You can also register in the standard way - via email.
- After you select one of the authorization options and fill in all the fields (if any), you will be asked why you are using this service. It is recommended to choose "For myself" or "For Learning".
- You will be transferred to the editor. Initially, the service will ask if you would like to undergo training and familiarize yourself with all the basic functions. You can agree or refuse.
- Click on the Canva logo in the top left corner to go to the customization area for the new template.
- Now opposite "Create Design" click on the button "Use custom sizes".
- Fields will appear where you will need to set the size of the image in pixels in width and height.
- To find out the dimensions of an image, right-click on it and go to "Properties", and there in the section "detail".
- After you set the size and click Enter, a new tab will open with a white background. In the left menu, find the item "My". There click on the button "Add your own images".
- AT "Explorer" select the desired photo.
- After downloading, find it in the tab "My" and drag it to the workspace. If it does not completely occupy it, then stretch the image using the circles at the corners.
- Now click on "Filter" in the top menu. A small window will open, and to access the blur options, click on "Advanced Options".
- Move the slider opposite "Blur". The only and main drawback of this service is that it will most likely blur the entire image.
- To save the result to your computer, click on the button "Download".
- Select the file type and click on "Download".
- AT "Explorer" Specify where exactly you want to save the file.


This service is more suitable for quickly blurring a photo and then editing it. For example, in the background blurry photo put some text or element. In this case, Canva will delight many users with its functionality and extensive free library various effects, fonts, frames and other objects that can be applied.
Method 2: Cropper
Here, the interface is much simpler, but the functionality is also less than that of the previous service. All the features of this site are completely free, and in order to start using them you do not need to register. Croper has a fairly fast processing and loading of images, even when slow internet. Changes can be seen only after clicking on the button "Apply", and this is a significant minus of the service.
Step-by-step instructions for blurring photos on this resource are as follows:

Method 3: Photoshop online
In this case, you may be able to make a sufficient high-quality blur of the background of the photo online. However, working in such an editor will be a little more difficult than in Photoshop, due to the lack of some selection tools, as well as editor lags when the Internet is weak. Therefore, such a resource is not suitable for professional photo processing and users without a normal connection.
The service is fully translated into Russian and, compared to the PC version of Photoshop, the interface is quite simple, making it easier for inexperienced users to work with it. All functions are free and no registration is required to work.
The instruction for use looks like this:
- Go to . Select an item or "Upload photo from computer", or "Open Image URL".
- In the first case, you will have to choose "Explorer" the desired image, and in the second just insert a direct link to the image. For example, this way you can quickly upload photos from social networks without saving them to your computer.
- The uploaded drawing will be represented by one layer. All layers of the workspace can be viewed on the right side of the screen in the section "Layers". Make a copy of the drawing layer - for this you just need to press the key combination ctrl+j. Fortunately, some of the hotkeys from the original program work in the online version of Photoshop.
- AT "Layers" see that the copied layer is highlighted.
- Now you can proceed to further work. Using the selection tools, you will have to select the background, leaving those objects that you do not intend to blur unselected. There are really few selection tools, so it will be difficult to select complex elements normally. If the background is about the same color range, then the tool is ideal for highlighting it. "Magic wand".
- Select the background. Depending on the chosen tool, this process will occur in different ways. "Magic wand" will select the entire object or most of it if it is the same color. The tool that is called "Isolation", allows you to make it in the form of a square / rectangle or circle / oval. By using "Lasso" you need to draw the object to make the selection appear. Sometimes it's easier to select an object, but in this tutorial we'll look at how to work with a selected background.
- Without deselecting, click on the item "Filters" that's in the top menu. From the dropdown menu select "Gaussian blur".
- Move the slider to make the blur more or less intense.
- The background is blurry, but if the transitions between the main elements of the picture and the background are too sharp, then they can be smoothed out a little with the tool "Blur". Select this tool and just drag it along the edges of the elements where there is a too sharp transition.
- The finished work can be saved by clicking on "File" and then on "Save".
- A save settings window will open, where you can set the name, format, and quality.
- Press "Yes", after which it will open "Conductor", where you will need to specify the folder where you want to save your work.


Method 4: Avatan Plus
Many Internet users are familiar with the functional online editor Avatan, which allows you to process photos with high quality due to the large number of built-in tools and settings. However, the standard version of Avatan does not have the ability to apply a blur effect, but it is available in the advanced version of the editor.
This way of applying the blur effect is remarkable in that you have full control over its application, but if you do not apply due diligence, the transitions between the subject of the photo and the background will be worked out poorly, and you may not get a beautiful result.
- Go to and then click on the button "Apply Effect" and select an image on the computer with which further work will be carried out.
- In the next moment, the screen will start loading the online editor, in which the filter we have chosen will be immediately applied. But since the filter blurs the entire image, when we only need the background, we need to remove the excess with a brush. To do this, select the appropriate tool in the left area of the program window.
- With the help of a brush, you will need to erase those areas that should not be blurred. Using the brush options, you can adjust its size, as well as its hardness and intensity.
- To make the transition between the in-focus object and the background look natural, try to use a medium brush intensity. Start painting over the object.
- For a more thorough and accurate study of individual areas, use the image zoom function.
- If you make a mistake (which is very likely when working with a brush), you can undo the last action using the familiar keyboard shortcut ctrl+z, and you can adjust the blur level using the slider "Transition".
- Having achieved a result that completely suits you, you just have to save the resulting image - for this, a button is provided at the top of the program "Save".
- Next click on the button "Apply".
- It remains for you, if necessary, to adjust the image quality, and then for the last time press the button "Save". Done, the photo is saved to your computer.


Method 5: SoftFocus
The final online service from our review is remarkable in that it allows you to blur the background in photos completely in automatic mode, and the whole conversion process will take just a few seconds.
The downside is that the result of blurring the background does not depend on you, since there are no settings at all in the online service.


The services given in this article are not the only online editors that allow you to create a blur effect, but they are the most popular, convenient and safe.
Hello to all those who came to my blog. Today is such a great weather. Finally feel the spring. And with such a spring mood, I would like to tell you about one thing. Now many people already have cameras with which we can make beautiful portrait photographs with a clear display of the main characters and background blur.
But still, not every fotik has such a function yet (mostly only SLR cameras), and most people use smartphones, which also cannot shoot with a blurry background, but you want to beautiful photo. Am I saying right? There is a way out, as usual, and today I will tell you how to make a blurry background in Photoshop. It's not difficult at all.
Archive brush
The easiest way to do this is to use the familiar . But first, let's open the image in Photoshop where we want to blur the background. I chose a photo of a girl on Red Square.

Do it carefully. If you suddenly hurt too much, then always. But don't do it all in one click. It is better to periodically release the mouse so that in case of an error you do not return to the beginning.
Well, that's about all. Looks beautiful. But let's look at a couple of other ways to broaden our horizons.
Eraser
In principle, everything here is the same as in the previous example, but with a small exception.

Many people prefer to use a layer mask in these cases, although I do without it in such cases. But just in case, I'll show you anyway. It won't take much time.
Layer mask

That seems to be all. Whichever way you choose, the result will be the same: Our friend is depicted with normal clarity, and the background is blurred. That is, it immediately becomes more beautiful and spectacular. see for yourself. By the way, which method did you like the most? Write, I'm interested.

No, Photoshop is still a great tool for working with images. I am still surprised - what a powerful, convenient and interesting editor it is. And at least knowing the basics will always come in handy in Everyday life.
By the way, if you want to learn Adobe Photoshop in the shortest possible time, then be sure to check out this wonderful video. All lessons are built in order, no extra water, everything is on the shelves. And most importantly, everything is shown on live examples and told in human language. It will be clear to any user level.
Well, that concludes my lesson today. I really hope that it was interesting and useful for you. Therefore, I recommend that you subscribe to blog updates to keep abreast of everything interesting. Well, I say goodbye to you for today, see you in other articles. Bye Bye!
Sincerely, Dmitry Kostin
Good day, dear readers! I am glad to present to your attention another lesson on the GIMP editor, from which you will learn how to create background blur effect on photo.
Certainly everyone likes photos with blurry background. What is the attraction of such shots? But the fact is that with the help of blur we remove all the extra garbage that clogs photo background and remains sharp, only the main subject that we are photographing. Take a look at these footage.
Or, for example, when photographing some kind of dish

From such photos it breathes "professionalism".
How to make such a blurry background?
Create silence ... now I will reveal to you the terrible secret of the recipe for such a frame. You will need:
1) good camera, mostly a DSLR with interchangeable lenses, such as the budget Canon 1100d

2) A lens with a large aperture, for example if you have a camera Canon(like mine), then the cheapest option would be to buy a Canon 50 1.8 lens

3) We put the lens on the camera and set the creative mode AV (or manual - M), which allows you to adjust the aperture value.
4) Set the aperture to 2, and even better to 1.8
5) Shooting...
Here is an example recipe for getting a blurry background on an image. But if finances do not allow you, then we can remotely approach a blurry background with the help of processing in graphic editors, such as photoshop and gimp. Thanks to the built-in tools in the editor, we can make the background pseudo-blurry. regular photo taken on an ordinary digital compact camera, the so-called "soap box".
And how this is done, we will now learn from today's lesson.
Step 1. Opening the original photo in the editor

Step 2 The next step is to select the main object in the photo, which we want to make sharp. To do this, the simplest, but at the same time universal method is to use the Free Selection tool or the so-called Lasso tool (as in Photoshop). After that, carefully outline the object. The more breakpoints you set, the better.

Step 3 While the selection is active, create a copy of the original photo through the menu "Layer - Create a copy" or by clicking on the icon "Create a copy of the layer"

Step 4 Now you need to right-click on the top layer and select "Add Alpha Channel" from the context menu that opens.

After that, press the Del button. See what you should get if you temporarily turn off the visibility of the bottom layer.

Turn on the visibility of the lower layer again and remove the selection through "Select - Deselect"
Step 5 Now let's use the standard filter of the blur editor through the menu "Filters - Blur - Gaussian Blur" and set the desired value in the settings.


Reference: This value depends on the original photo. The higher the resolution (photo size), the larger the input parameter. For this example, I took the size 30px
Step 6 If necessary, you can adjust the opacity of the top layer with the effect, to do this, move the opacity slider to the left until the desired effect is obtained. For example, I set the value to 80.

So, in a few simple steps, we got a sharp object, which is now the focus of our viewer's attention.
Soon I plan to tell you friends about creating more realistic background blur with additional. If you do not want to miss the output of this lesson, then I advise.
That's all for me. Thank you all for your attention and see you in new lessons.
P.S. Special thanks to reader Lare for the lesson idea!
Sincerely, Anton Lapshin!
Little BONUS:
Greetings, dear reader! I'm in touch with you, Timur Mustaev. I am often asked how to make a blurry background on a camera, and I always answer them that this cannot be done on a camera, it can be done using a camera and an adjacent lens. This is what will be discussed today in this article.
Of course, you can get a beautiful blur, but only on the image itself. And do it with a camera (not on it). Correct staging question or problem is half the answer. So before you experiment with photography, you should understand the terminology.
What is bokeh?
Today's lesson will be interesting, as always, and creative. I'll show you how to make an attractive background blur in a photo. In another way it is called bokeh. As you may have guessed, the main object remains untouched, and around it the objects and the landscape disappear from the field of view, turning into a color spot, somewhat reminiscent of fog.
It all looks very impressive, many people love bokeh for its ability to highlight the main character of the frame and enhance the sense of perspective of the entire photo. The first moment is significant for portrait shooting, the second - more for landscape.
I often notice blurry backgrounds in commercial shots, including famous wedding photographers. But, perhaps, earlier this technique was more popular, but now it is losing its originality. Bokeh, natural or artificial, is pleasing to the eye, but they no longer surprise anyone.
Technical highlights
It doesn't matter which one you have Canon camera, Nikon or, for example, Sony, a beautifully blurred background can be made on any of them, because the principle is the same. The main thing is to be able to use the capabilities of the camera. To a greater extent, this effect does not depend on the company or the internal structure of the camera body, but on the optics, in particular on the aperture value (f). There are several ways to easily blur the background. Let's distinguish two groups:
Using camera settings
- Diaphragm: you set the minimum value of f, i.e. 3.5, 2, 1.8…, thereby reducing the depth of space in the image and reducing the number of clearly visible objects.
- Focal length. Turn your zoom as far as possible on the lens to achieve blur. Or use long lenses where focal length equals 105 mm., 200 mm., etc. Wide-angle lenses will not give the desired effect.
- Physical distance to the object (in meters). Take a few steps towards your subject. BUT: You can get close to the subject, but the camera will not want to shoot. This means that you overdid it and exceeded the allowed minimum distance for photographing your optics - step back slightly.
- Focus ring, spot focus. The camera lens has an outer ring for manual setting focus. Adjust it if otherwise blurry background cannot be achieved. Also, choose in the settings not auto, but 1-point focusing, pointing it at the desired object. With the automatic option, the device itself will determine which parts of the image to make clear, but this situation does not suit us at all.
I note that all of the above methods work for one indicator - the depth of field in photography. This is the depth of field of the entire surrounding space that falls within the boundaries of the frame. And we need to work to reduce it. Subject to specified points only one area, usually in the center of the viewfinder and hence the picture, will be perfectly sharp, while the rest will become increasingly blurred as it approaches the edges.
External accessories and items (special nozzles, cardboard, etc.)
Very successfully, you can use a translucent scarf for these purposes. It will enliven the photo with brightness or add tenderness with pastel colors. Lights look interesting and funny, for this an ordinary garland located near the lens is suitable. It is not necessary to place these objects symmetrically with respect to the main object: fill the empty space with them on one side, and balance the composition with the main object on the other. With special attachments, everything is easier - put it on and take a photo.

Making a blurry background
I remind you that you can “play” with the background not on the camera itself, but on the image with the direct participation of the camera and setting the settings. The only thing that we can do on the device is a device like an external nozzle, in order to end up with bokeh in the picture. For those who still have a bad idea of how to achieve the effect of blurring or blurring the background of a photo, I outlined a few simple steps:
- Select a subject to shoot. Let's say it's a person. Decide on the place where it will be located. Let the character be removed from the background.
- Fix the device for blurring the background (bag, light scarf, etc.) on the lens in such a way that it partially, along the edges, covers the glass. It's so useful for enhancing bokeh and creative experiences.
- Set the minimum aperture that is possible on your optics. You need manual mode, you can select aperture priority.
- Set the focus to single point and focus the main point on the person. Shoot.
By the way, you can use the services of graphic editors to create the desired blur. If your technique is of poor quality, you will hardly notice any blurring in the image. This is where Photoshop knowledge comes in handy.
In the filters section there is such a Gaussian Blur tab. Choose the area you want and you're done! Beauty, and nothing more, and without the hassle of shooting. This is also convenient if there is no blur on the original photo, and you decide that it is necessary there after photographing.

or My first MIRROR- very competent and useful course, especially for a beginner. They describe in more detail and examples how to make a beautiful blurred background. They contain a large number of lessons in all areas of photography. After watching, you will appreciate the effectiveness of video courses.
My first MIRROR- for adherents of the CANON SLR camera.

Digital SLR for beginners 2.0- for adherents of the NIKON SLR camera.

- a video course, more aimed at post-processing photos using the powerful Lightroom program. There are a lot of useful tricks for high-quality photo processing in the course.
Lightroom is an indispensable tool for the modern photographer.

You are probably wondering why these courses, because there are many others on the Internet? I will say right away that there are a lot of others, a whole bunch of them, but the question is, are they of high quality? Not always. I have looked at many other courses, but they are very far from the quality that I recommend. But as they say, the choice is always yours! My job is to recommend quality!
Happy readers! If you have not yet been familiar with such a great way to diversify your work, then by all means give it a try. Experiment with both people and non-living objects. Notice how moving away from something, someone, or closing the aperture changes the blur zone. Good luck! And remember that you can easily subscribe to my blog, where there are many more useful information for photographers.
All the best to you, Timur Mustaev.


