Do-it-yourself painting of plates: a master class on spot painting, Khokhloma painting, painting plates using the Gzhel technique, video materials on decorating plates with your own hands. Dot-painted plate Dot-painted tableware
Plate painting is one of the oldest arts, which enjoys great success in modern society. In the time of our ancestors, painted plates were the main component of the decor of living quarters. They decorated the shelves hung on the walls. Many of us can remember such products in the homes of our beloved grandmothers. They were very fond of putting painted dishes in sideboards and kitchen cabinets.
Similar chic decorative products can be found today. At the same time, you can buy ready-made painted dishes, or you can paint the plate with your own hands.
 Do-it-yourself painting of dishes cannot be called an easy task. It is not enough to go through a couple of online lessons to learn how to decorate plates with high quality and draw pictures on them.
To do this, you need to study in special courses, which can last quite a long time. But, it is worth noting the fact that anyone can learn the art of painting.
In this case, it is necessary to take into account all the subtleties that are described in detail during the master classes. The painting technique directly depends on the correct selection of materials and tools for work. You can decorate wooden dishes, porcelain, glass and ceramics. The main condition is the complete absence of any original drawings.
Pattern making tools:
- Paints. They can be water-based, acrylic or silicate. The most popular are acrylic paints, since working with them is quite simple and even a child can handle it.
- Markers. Nowadays, the market provides a huge selection of special waterproof felt-tip pens, working with which bring real pleasure.
- Tassels. In most cases, painting dishes requires several types of brushes. Their thickness depends on the pattern, but the patterns often contain both the finest details and quite voluminous ones.
- Paint remover. It is extremely necessary for beginners, since at the training stage, not everything will work right away.
Gallery: plate painting (25 photos)


Types of painting
There are several basic techniques for applying a pattern that have been used by craftsmen for many years:

The sequence of actions for painting
Regardless of the degree of complexity of the drawing, there is a certain algorithm for applying images:

Painting of ceramic plates
 Ceramics is the most widely used image material. But in order to paint ceramic dishes, skills are needed, since working with ceramics is quite difficult. As a rule, drawing on this material requires long-term training, during which specialists give master classes with detailed description of the procedure.
Any paints that are resistant to hot and cold water are suitable for working with ceramic products, but enamel is the most ideal. It is she who fits well on clay and allows the product to remain attractive for quite a long time. Also, ceramics are often painted with acrylic paints. They are perfect for beginners.
To begin with, the surface of the ceramic product is prepared as described above, and after that you can safely get to work. Drawings can be applied using stencils or thin brushes. In addition, special markers are used for drawing on ceramics. Patterns can be anything, it all depends on the imagination of the master, how he wants to paint a mug or plate. Beginners are most often advised to use templates, but later, with an increase in the level of professional skill, it will be possible to draw directly on the surface of the dishes without the use of stencils and blanks.
How to paint a plate with acrylic
 Thanks to acrylic paints, you can give new life to white porcelain saucers and plates. Blue paint will look especially beautiful on a white background. But she is no exception. Bright, saturated tones, combined into three-dimensional drawings, look pretty good. Blue prevails in Gzhel painting. Waves, flowers, geometric shapes or abstract designs can be offered as patterns.
The most common is painting under Gzhel. For its implementation, special stencils are used. Thanks to this technique, any nondescript saucer will become a real decoration of your interior. There is a huge selection of Gzhel stencils with images of birds and flowers.
For work you will need:
- white dishes made of ceramics or porcelain;
- simple pencil;
- stencil with the desired pattern;
- acetone;
- acrylic paint in blue and blue;
- brushes of different thicknesses.
We degrease the dishes and use a simple pencil to draw a stencil pattern. Next, with strokes, we begin to paint over the contours of the picture, having previously practiced on a piece of paper. It is necessary to combine cyan and blue tones to obtain a contrasting image. Carefully wipe the mistakes with acetone, trying not to affect the good areas. At first, beginners use templates with the desired color scheme.
 You can safely introduce children to the art of painting. A child may not have artistic talent, but this does not become a hindrance to drawing on dishes. From an early age, children can apply simple images with fingers, the pads of which are dipped in paint. These can be dots, lines or simple strokes. Often, kids really like this activity, and many of them are further interested in artistic painting more seriously.
In addition to finger technique, there is also painting with special stamps. In children's art stores you can buy sets with a wide variety of images. It can be animals, flowers, geometric shapes and much more. For applying stamps, ceramic or porcelain dishes, acrylic paints and brushes are required. Older children can combine stamping and drawing with brushes.
Today it is very popular to decorate your homes with cute handmade items. Some types of such creativity are available only for experienced needlewomen, others will be possible even for a child. Such an accessible view is the painting of plates. There are many techniques for its implementation, and as a result of the process you will get a wonderful decorative thing to decorate the kitchen or dining room.
Plates made of ceramics, glass, wood, porcelain are suitable for painting. It can be both special products for decor, and ordinary, plain ones. The main thing is that there are no factory drawings on the dishes.
Before starting work, it is worth deciding on the technique, since there are several types of it:

You can draw with paints (acrylic, silicate, water) or indelible felt-tip pens. Regardless of the complexity of the pattern being performed on the plates, the order of work is usually the same:

Pique technique
 You can paint a plate with your own hands using the pique technique. In this case, the pattern will be created by drawing dots along a given contour. This technique allows you to achieve the effect of beadwork, embossing, or even inlay with stases or precious stones.
For work, it is best to take durable contour acrylic paints. When choosing them, it is worth checking that they are of the right consistency - not too liquid and not too thick. They should pop out easily., but do not spread like a puddle.
If the selected paints are not in tubes, but in jars, then you can apply dots with a thin brush, toothpick or needle.
After carrying out the preparatory work (degreasing, priming), you can immediately start applying the bitmap. If such work is being done for the first time, it is better to pre-execute a stencil, sketch or markup, as well as think over the color scheme of the future painting in advance. It is very convenient to use the template, which is attached to the back of the plate.

In order to get the painting of ceramic plates using the pique technique the first time, it is worth practicing on paper - applying dots of the same size with equal intervals between them.
Point to point tips:

Gzhel painting
 Gzhel painting - traditional elegant Russian painting in blue and blue tones on products made of snow-white clay. To paint a plate in this style, you need to prepare blue acrylic paints of different tones and brushes of different thicknesses. In addition, the plate itself must be pure white.
Before proceeding with the painting itself, you can practice on paper. To begin with, depict the simplest elements inherent in this style: dots, lines, strokes, nets, arcs, simple ornaments, borders, droplets.

An interesting technique is a "dab with a shadow", is found in many products painted in the Gzhel style. To complete it, you will need a wide brush (No. 10-12). To achieve the desired effect, you should correctly distribute the paint on the brush - there should be more paint on one side than on the other. Thanks to this, the stroke will be darker on one side and lighter on the other.
For the convenience of painting, you can use a stencil, a plate template for drawing, or mark up. From simple elements (dots, lines, droplets) you can create characteristic patterns in floral motifs (flowers, blades of grass).
Ideas for drawing with children
 Creating a painted plate can be an excellent opportunity for joint creativity with a child. The simplest, but at the same time spectacular and fascinating method is finger painting.
For example, in this way you can depict a tree. After degreasing the surface, you need to paint the trunk and branches of the tree with acrylic paint using a brush. Then grease the sponge with green (or any other) paint. Next, you need to touch the sponge with your fingertips and leave an imprint on the plate - each such imprint will depict a leaf.
A simple (affordable for a child) and fairly quick way to decorate a plate is to apply a geometric pattern. To work, you will need masking tape, which must be glued to the surface, creating a simple geometric pattern (for example, a zigzag line).
Publications in the Traditions section
Riddles of patterns of Russian paintings
Have Gzhel dishes always been blue and white, what traditional painting was born after the October Revolution, and why do the painted caskets glow? We understand the secrets of folk art crafts.
Golden bowls. Khokhloma painting

Golden bowls. Khokhloma painting

Golden bowls. Khokhloma painting
The master began his work by beating the buckets - he prepared wooden blocks (buckles) from linden, aspen or birch. They made wooden spoons and ladles, cups and salt shakers from them. The dishes not yet decorated with painting were called linen. The linen was primed and dried several times, and then painted in yellow, red and black tones. Floral ornaments, flowers, berries, lace twigs were popular motifs. Forest birds on Khokhloma dishes reminded the peasants of the Firebird from Russian fairy tales, they said: “The Firebird flew past the house and touched the bowl with its wing, and the bowl became golden”.
After drawing the pattern, the products were covered with drying oil two or three times, tin or aluminum powder was rubbed into the surface and dried in an oven. After hardening with heat, they acquired a honey hue and really shone like gold.
At the beginning of the 18th century, dishes began to be brought to the Makariev Fair, where sellers and buyers from all over Russia gathered. Khokhloma products were known throughout the country. Since the 19th century, when guests from all over Europe and Asia began to come to the Nizhny Novgorod fair, painted dishes appeared in many parts of the world. Russian merchants sold products in India and Turkey.
Snowy background and blue patterns. Gzhel

Snowy background and blue patterns. Gzhel. Photo: rusnardom.ru

Snowy background and blue patterns. Gzhel. Photo: gzhel-spb.ru
Snowy background and blue patterns. Gzhel. Photo: Sergey Lavrentiev / Photobank Lori
Gzhel clay has been known since the time of Ivan Kalita - from the 14th century. Local craftsmen used it to create "vessels for apothecary's needs", dishes and children's toys. At the beginning of the 19th century, factories appeared in the Gzhel volost, where porcelain was made. The first enterprise here was founded in 1810 by the merchant Pavel Kulichkov. At first, painting on porcelain dishes was colored, but in the middle of the 19th century, the fashion for white and blue Dutch tiles and Chinese porcelain of the same shades came to Russia. Soon, blue patterns on a snowy background became a hallmark of Gzhel painting.
To check the quality of porcelain, before painting, the product was dipped in fuchsin - red aniline paint. Porcelain was painted in an even pink color, and any crack was noticeable on it. Masters painted with cobalt paint - before firing it looks black. With the help of special techniques, working only with a brush and paint, the artists created more than 20 shades of blue.
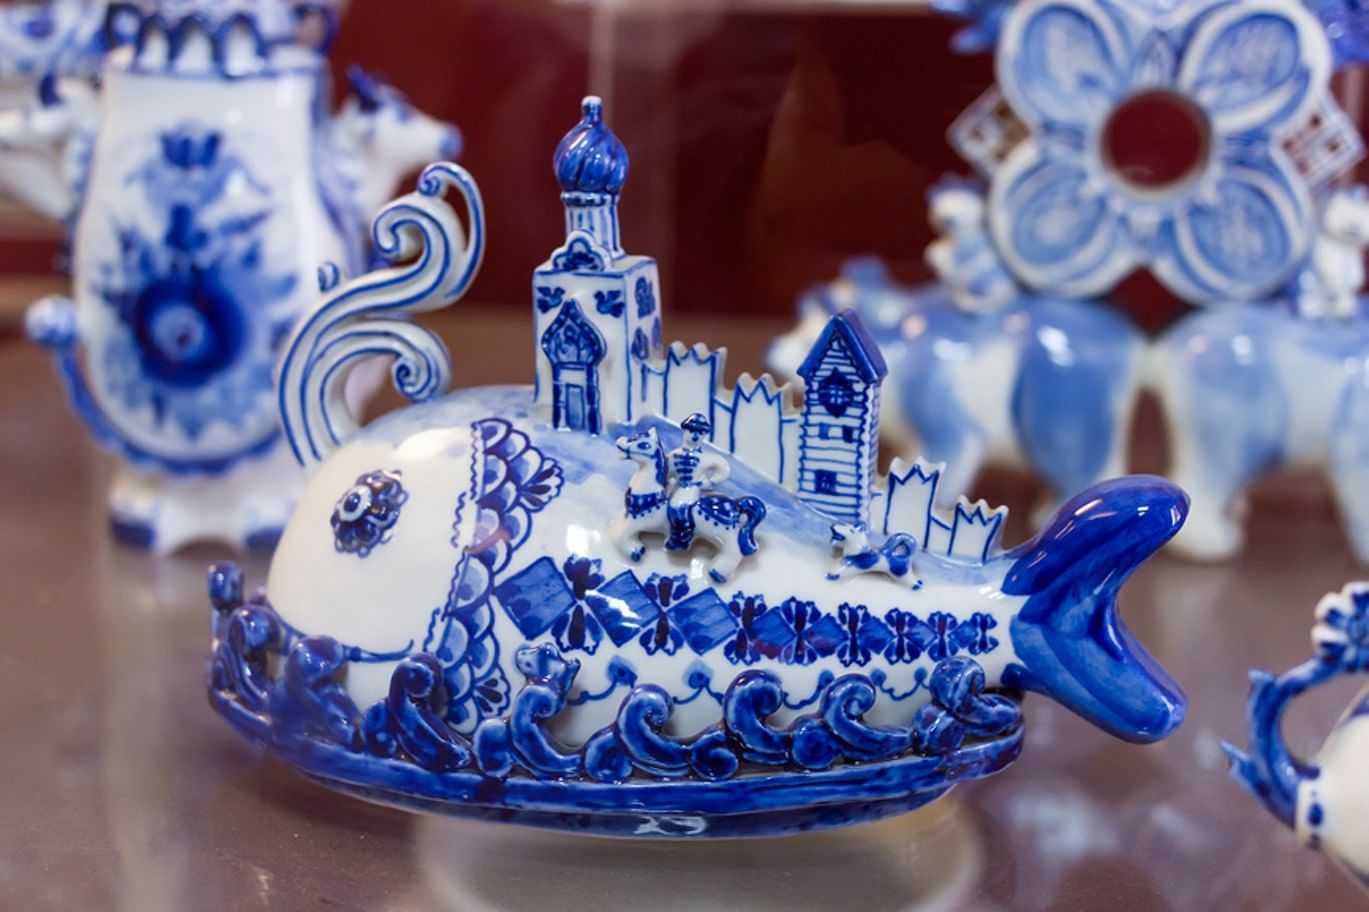
Gzhel plots are lush roses (they were called "agashki" here), winter landscapes, scenes from folk tales. Children go sledding, Emelya catches a pike in a pond, the villagers celebrate Maslenitsa... After drawing a picture, the dishes were covered with glaze and fired. Pink products with black patterns acquired their traditional look.

Luminous brooches and jewelry boxes. Fedoskino lacquer miniature

Luminous brooches and jewelry boxes. Fedoskino lacquer miniature

Luminous brooches and jewelry boxes. Fedoskino lacquer miniature
“When we organized the artel, we had only one collection of Pushkin’s works for seven people ... This largely explains the fact that we wrote most of our miniatures on Pushkin’s stories.”
Alexander Kotukhin, miniaturist
In 1932, Palekh artists met with Maxim Gorky, who called the Palekh lacquer miniature "one of the miracles created by the October Revolution". At his request, Ivan Golikov drew miniatures for the deluxe edition
Today, all kinds of hand-made products are becoming very popular - from home-made jewelry to volumetric elements for room decor. They demonstrate the subtlety of the needlewoman's taste and emphasize its originality and uniqueness. In our article, we will talk about how you can make painting plates with your own hands. Moreover, it can be both decorative products for decorating walls, and ordinary ones intended for food. In any case, both of them will please you much more if you put a piece of your soul into them, decorating them to your taste.
Painting with a special marker
Marker painting is the simplest and most affordable technique for beautifully painting plates. For this method, you need to buy a special porcelain pencil, create a pattern and temper the dishes.
Important! This option is suitable for those who would like to combine subtle and delicate floral designs and large letters.
In order to create a pattern on plates in this way, you will need the following:
- Porcelain plates with a Chinese-style floral design, with the number of plates equal to the number of letters in the word you are about to write.
- Black permanent marker.
- Cardboard for stencils.
- Pencil.
- Ruler.
- Stationery knife.

The sequence of action looks like this:
- Make a stencil for the letters. To do this, print on cardboard and cut with scissors, choosing the size and font of your choice.
- Put each stencil on a separate plate, and then circle with a pencil.
- Color the resulting letters with a permanent marker.
Important! In order not to get out of the edges, it is advisable to use a ruler.
- Make a second layer to make the color more uniform.
- The plates are ready, you can decorate the apartment.
The inscriptions on the plate
How about sipping coffee or tea while reciting your favorite poem or inspirational quote straight from your saucer or cup? Like the idea? Then we present you with a do-it-yourself option for painting plates, a master class that will show you how to do it.
To work, you will need the following:
- A white saucer or cup with flat edges (porcelain or ceramic).
- Marker Pebeo Porcelaine 150.
- A few cotton swabs (to correct mistakes).
- Book of quotes or poems.
- Glass cleaner or alcohol.
- Degrease the dishes with rubbing alcohol or glass cleaner to improve the adhesion of the paint.
- Decide in which direction you will make the inscriptions. For example, on a saucer to the center from the edges, and on a cup along vertical lines or also in a circle from top to bottom.
- Select the desired text for the caption.
- Try out the marker on a piece of paper as it may bleed at first. Write a little on the draft.
- Start painting the dishes, calculating the place so that all the desired text fits.
- Leave to dry for a day.
- After the lapse of time, put the dishes in a cold oven and set the temperature to 150 degrees. When the oven has reached the desired temperature, set the timer for half an hour and leave to bake. Then turn off the oven and let the cookware cool completely before removing it.
Painting with acrylic paints
White plates look simple and elegant. However, if you make a small amount of effort to paint them somehow beautifully, they will become simply amazing. In this master class on painting plates with our own hands, we will tell you how to create an abstract drawing - it will be possible for both professionals and beginners.
To work you will need the following:
- Porcelain tableware in white.
- Water-based porcelain paint (for example, Pebeo blue, turquoise, golden paint).
- Solvent.
- Brushes.
- Small jars.
- Wooden sticks for mixing paints.
- Alcohol.
The sequence of actions looks like this:
- Degrease the dishes with alcohol so that the paint lays down better.
- Place a small amount of each paint color in separate jars.
- Add thinner to the paint to create a watercolor effect.
- Stir the contents of the jars with wooden sticks.
- Apply paint to the plates. Move the brush, creating a wave effect, or draw a small amount of paint into a pipette, squeeze it onto the surface of the dish and twist it so that the paint spreads, creating a unique pattern.
- Leave the plates to dry overnight.
- After the lapse of time, put the dishes in a preheated oven and set the temperature to 150 degrees. When the oven is at the desired temperature, set the timer for 35 minutes and leave to bake. Then turn off the oven and leave the dishes to cool, then remove them from there.
Important! Such dishes can be used both for decorative purposes and for eating. This paint is safe for human health.
To match the plates, you can arrange cups in the following options:
dot painting
With the help of dot painting, you can create very beautiful decorative plates. Also in this technique, you can decorate the surface of teapots and cups, which does not come into contact with food (that is, you can paint only the outer surface).
The work will require the following:
- Patterns with a pattern.
- Red copy paper.
- Scissors.
- Napkins.
- Porcelain or ceramic plates, cups.
- Paint for ceramics (for example, Porcelaine 150).
- Ball pen.
- Wooden sticks.
- Bottle with applicator.

The sequence of work looks like this:
- Place carbon paper on the surface of the dishes, and a template with a pattern on top.
Important! The paper should be slightly larger than the drawing.
- Move the drawing with a ballpoint pen, while trying to put more pressure on the pen so that the drawing is imprinted on the surface of the dishes.
- Pour the paint into the applicator bottle.
Important! If you want a lighter shade of paint, mix it with white paint, mix well, and then pour into a bottle.
- Using the applicator bottle, start applying paint according to the intended pattern.
Important! If the tip of the bottle becomes clogged with ink, clean it with a pin.
- Leave to dry for a couple of hours. If there are traces of the pen, remove them with a napkin.
- Put the dishes in a cold oven and set 150 degrees. After the oven has warmed up to the required temperature, set the timer for half an hour and leave to bake. After the time has elapsed, turn off the oven and leave the dishes to cool, then remove them from there.
footage
Plates are the most convenient items for painting in many ways. For these purposes, you can either buy new dishes or use old, boring items, breathing new life into them. Do-it-yourself plate painting is a very interesting activity that will help you show your imagination and decorate your home in an original way.
Since ancient times, people have paid attention to the beauty of nature. The desire to decorate your primitive life and make it cozy led to the fact that they began to decorate the dwelling with various natural elements. It was the skin of an animal underfoot, drawings on the wall, colored stones, shining metal, and much more. Centuries later, plates, spoons, bowls began to be painted. Each region has its own dishes.
Types of styles
The art of decorating one's own homes arose almost simultaneously with the development of people's culture and has its own distinctive features that are characteristic of individual areas:
- Khokhloma painting;
- Gorodets;
- Zhostovo;
- Gzhel.
The imagination of our ancestors knew no bounds, but the differences in the drawings are still obvious. Each area has a peculiar ornament and handwriting.
The emergence of Khokhloma painting
Near the old Volga forests near the Uzola River there are Russian villages - Khryashchi, Kuligino, Semino, Novopokrovskoye, Khokhloma. Ware, painted with various gilded patterns, originates from here.
Unfortunately, it is not possible to accurately establish the beginning of the appearance of Khokhloma painting. After all, all the dishes were made of wood, wore out quickly, were thrown away or thrown into the oven, like an ordinary log.
Products of the 19th century have survived to our time. But, judging by historical papers, the craft originated in the 17th century.
The unique technique of Khokhloma - painting with black paint and cinnabar is performed on a gold base - is found in ancient Russian art.
Features of Khokhloma painting
The masters have their own secret of how to “goldenize” kitchen utensils. A simple way to cover dishes with gold has survived to our times:
- dishes were carefully rubbed with tin powder;
- covered with drying oil;
- heated in an oven;
- under the influence of high temperature, the drying oil turned yellow, tin was visible through it, the effect of gold was obtained.
It is believed that this method of painting dishes belongs to the Old Believers. Previously, in remote villages there were many fugitives who suffered persecution for the "old faith". Among them were masters of icon painting and book miniatures.

Khokhloma patterns
Inexpensive dishes for everyday use can be recognized immediately. It was made with special stamps from a raincoat mushroom or a felt piece of fabric, the patterns turned out to be elementary, but did not lose their beauty. Numerous rhombuses, spirals and leaves are visible on such products.
More expensive dishes were painted more skillfully. The compositions were created with a brush by hand. There is much more work here. Masters drew:
- berries (raspberries, strawberries, mountain ash);
- flowers (cornflowers, clover, violets).
This is how painted spoons, plates, mugs and much more were created.
The main colors characteristic of Khokhloma painting are red (cinnabar) and black (soot). But in order for the drawing to come to life and bloom, brown, green, blue, orange and yellow shades were added to the products.
Types of painting
Gradually, Khokhloma products became souvenir gifts or decorations from household items, and not cheap ones at that.
There are main types of painting dishes:
- "Horse" - the main composition - kriul - is superimposed on a silvery background. Further, droplets, antennae, curls are added to it in red and black.
- “Under the background” - at first, the silhouette of the ornament looms, and the background is filled with black paint.
On the dishes can be a variety of types of ornaments:
- "Grass" - the emphasis is on drawing small and large blades of grass.
- "Gingerbread" - inside the masterpiece is a painted geometric figure. It can be a rhombus, a square, a circle. It is painted with berries, flowers and grass.
- "Kudrina" - a pattern is applied on a red or black base in the form of golden leaves and flowers in the manner of curls.
Khokhloma is an amazing work of art, despite the dark colors, warmth and joy emanates from it.
History of Zhostovo painting
Another of the famous types of painting dishes is. It is famous for the fact that for almost two centuries they decorate one thing - this is a tray. The village of Zhostovo is located in the Mytishchensky district near Moscow.
In the 18th century, in the Urals, where the Demidovs' metallurgical plants were built (Nizhny Tagil, Verkh-Neyvinsk, Nevyansk), a craft arose - painted metal trays.
The birth of such a craft near Moscow was caused by some important factors:
- The Russian serf craftsman Khudoyarov discovered the recipe for “crystal” lacquer; it did not crack on copper, wood and iron.
- Start of production in St. Petersburg of an unusual shape of trays with interesting drawings.
- The opening of the workshops of F. N. Vishnyakov in Zhostovo in the 1820s. Painted papier-mâché items were produced here: trays, caskets, snuff boxes, boxes, stamps.
Products were made in villages near Moscow - Troitsky, Novoseltsevo, Ostashkov. Only in the village of Zhostovo there were 22 workshops. The objects were very beautiful. They depicted landscapes, winter troikas of horses, summer walks, tea parties at the table. But, unfortunately, these gizmos turned out to be fragile and impractical.
The appearance of Zhostovo iron trays
Osip, the son of Philip Vishnyakov, decided not to make papier-mâché anymore, but took up the production of iron trays. As the demand for trays increased. They were used both for interior decoration and for their intended purpose. Zhostovo trays were seen in drinking establishments, the famous tea houses of Moscow, taverns, hotels and merchant houses. Collections of Spanish and British kings can boast of having Zhostovo trays.
Demand creates supply, and in 1960 the Zhostovo painting factory was founded.

Mastery Secrets
Watching the long and painstaking process, you can see how the craftsmen still observe the old technique of execution.
- Zamalevok. The basis of the future pattern. Sketches of the future drawing are made on the prepared plane with diluted paint.
- Tanya. Colored shadows are applied with translucent paints. A visible volume of flowers is created and shadow areas of plants appear.
- Color lining. This is the most important stage of the Zhostovo layer-by-layer painting. The appearance of the bouquet is formed, the whole composition is lightened or darkened, important small details are determined.
- Glare. Thanks to this action, volume and light appear, a combination of features and mood are well conveyed.
- Drawing. The final part of the image. The artist manually applies small but significant details.
- Binding. The bouquet, as it were, spreads under the background of the product. Thin stalks and tendrils appear magically in a single whole and unite with the background.
- Cleaning the edges of the tray. The side of the tray is decorated with all sorts of patterns. Without it, the work will seem unfinished.
- Mirror shine. With the help of chalk powder, the tray is rubbed with palms to a shine, then rubbed with paraffin, this makes the product shine even more.
Zhostovo trays have been around for many years, but none of them is alike.

Painting features
The background is usually chosen black, in rare cases red, blue or green. The artist paints several trays at once.
The main direction is a flower bouquet, in which small wild flowers and large garden flowers are alternately drawn.
Patterns are drawn with gold powder diluted in transparent lacquer or turpentine or gulfabra - white paint mixed with lacquer, it is sprinkled with aluminum powder.
By value, trays are divided into two groups: for decorating the interior and for domestic purposes.
Gorodets painting
Refers to one of the Russian types of painting dishes. Gorodets painting originates in the 19th century near the city of Gorodets in the Nizhnegorsky Trans-Volga region, on the left bank of the Volga. This is an ancient Russian city-fortress. It all started with a spinning wheel, which featured a bottom and a comb.
Carriages, ladies, horsemen, soldiers, dogs - all this adorned the bottom of the spinning wheels. The figurines were cut out of wood of a different breed and inserted into the corresponding hole.
Gorodets painting took 50 years to develop. Children's wheelchairs, chairs, boxes were painted. The peak of development of the fishery came in 1990.
Painting motifs

The most common elements of Gorodets painting are flowers and animals. From such images emanates comfort and peace.
Painted spoons, furniture and utensils in the Gorodets joyful style refreshed and enlivened the interior.
Flower painting in execution is the simplest. There are several types of ornament:
- "Bouquet" - applied symmetrically, present mainly on dishes or cutting boards.
- "Garland" - one or two flowers are located in the center, smaller flowers and leaves spread from them in all directions. Bread bins, dishes, caskets are painted with this pattern.
- "Rhombus" - a type of garland. There is a flower or several in the center, and the leaves and buds decrease as they approach the tops of the rhombus. And they are located on the imaginary edges of the figure. Chests, benches, cabinets were decorated with such images.
- "Flower stripe" - has remained since the days of spinning wheels. This is a repeating ribbon pattern of flowers of the same size, diluted with leaves. Decorate bulk items.
- "Wreath" - similar to the "flower strip". The difference is that it closes around the edges of the lid or dish.
In the flower painting there are images of a bird and a horse. Usually they are drawn inside a flower garland. Elements of Gorodets painting found their place in large items: panels, sleighs, dishes and caskets.
Images can be very different: dashing riders, scenes with tea drinking, beautiful birds, pretty girls with dogs, exotic lions and leopards. Most often there is a proud horse or a warlike rooster.
Execution method

The technique of artistic painting is different in that it is performed directly on a wooden base. The base is primed in different colors - bright blue, rich green, deep red.
The object is painted with a brush without a preliminary sketch. The artist changes the pressure of the brush: now with a broad stroke, now with the tip, drawing another masterpiece.
History of Gzhel
One of the ancient pottery regions includes about 30 villages. It is called Gzhel. It is located near Moscow near the river Gzhelka. In these places, the richest deposits of clay were discovered.
Gzhel is mentioned for the first time in written documents dating back to 1339. It was a profitable volost and was the property of princes and kings.
In the 18th century, Gzhel became a Russian majolica manufacturing center. A century later, Gzhel began to produce semi-faience, painted with cobalt and covered with transparent glaze. Closer to the 20th century, Gzhel masters made masterpieces from fine faience and porcelain, decorating it with floral and geometric patterns.

The subject of the drawing
Gzhel painted ware reflects the events taking place in urban and rural life, as well as natural phenomena. Drawings are divided into three main groups:
- Vegetable. Here, all vegetation has a stylized appearance with basic features. You can see berries, blades of grass, cuttings, flowers and leaves.
- Ornamental patterns. Original and stylized drawings that show the artist's association and self-expression. It is performed with ornamental nets - "antennae", "blades of grass", "droplets", "combs" and "pearls".
- Story painting. These are sleigh rides, fairs and seasons.
Gzhel is a whole stylistic direction, and not just patterns. It is used in the production of ceramics, in the design of clothing and interior design.
In such a miraculous way, Gzhel masterpieces arise, “like fabulous birds”, and fly around the globe. Therefore, the blue bird in Gzhel is a brand of modern painting.
The main features of the painting:
- surface glazing;
- cold white background;
- ornament in blue and blue tones;
- a complex pattern or drawing in a folk style;
- only handmade.
Each item is hand-painted and is a work of art. All drawings are unique.
Artistic painting of Gzhel
Gzhel technique requires certain skills. The master starts painting any thing immediately after firing. One of the paintings in the Gzhel style is called majolica, it is signed with the “five-flower”. A pattern was applied to white enamel, which is the basis.
Colors for painting used to be taken from salts:
- green - copper salt;
- yellow - antimony salt;
- cherry - manganese;
- blue - cobalt.
Soon this technique was abandoned and they began to perform a cobalt blue pattern on a snow-white base. Drawing a picture required talent, a spatula, a brush, a jar of cobalt oxide. It is cobalt that gives such a wonderful shade of blue, but only after firing the painted dishes, and the paint itself is black.
First, the product is painted, then it is dipped in glaze and placed in an oven for drying. The last stage of firing is carried out at a temperature of 1400 degrees. The glaze turns into a thin, light-transmitting film, covering the blue pattern.

Thanks to the atmosphere of folk non-academic art, the purity and originality of patterns, the Gzhel blue bird was honored to be the emblem of the Gzhel porcelain factory.
In the age of technology and change, it seems that there is no place for cute painted things, and you can admire them only in museums. But to this day in the Russian state there are workshops that have preserved the old traditions of artistic painting, and continue to delight the eyes of people who are not indifferent to such art.


