House woodcarving: examples, techniques, tips, working with stencils to decorate the facades of the house. House carving House wood carving
As soon as people began to live in caves and huts, they immediately woke up a craving for beauty. They wanted to decorate their homes with what seemed to them the most attractive. This was done in order to scare away other tribes, as well as to show their status and importance. For the same purposes, they decorated themselves. Later, with the advent of the polytheistic religion, decorations began to be made in order to appease the gods: in time to cause rain, drive away evil spirits, get a harvest, and so on. Much later, decorating a house became a real art that required skill and perseverance. In the summer, people worked in the fields, and in the short winter days they could afford to indulge in such a hobby as carving. Various ornaments served as amulets, figurines of animals and birds were carved, plant elements were used. We will tell and show everything about house carving and its interesting facts!
Later, a separate branch of woodcarving was formed to decorate the facades and platbands of the house, which was called house carving.
It is better to collect material for wood carving in winter - the tree is drier at this time of the year, the juice does not circulate in it. The blanks are dried for several years, but in construction and specialized stores you can buy ready-made timber.
Soft woods like linden and alder are well suited for interior work, and hard, coniferous woods are well suited for outdoor decoration. They are more difficult to cut, but they last much longer. In addition, with modern tools, hardness is not a big problem: a router or an electric jigsaw is often used for house carving. To get beautiful products, you do not need to have the ability to draw. It is enough just to hold the tool firmly in your hand and cut clearly according to the stencil.
It should be noted that for the exterior decoration of the house, the technique of slotted carving is most often used.
Before you start carving for your home: tools, tips, preparation.First you need to purchase a tool. It can be a manual or electric jigsaw with a set of files or a router. You will also need a drill, sandpaper, and also varnish or paint suitable for outdoor work; brushes for them.

It is necessary to measure all parts of the house that are to be decorated. According to the dimensions, pick up bars with a thickness of 1.5-2.5 cm. It is important to ensure that they are made of hard wood, do not have cracks, knots and chips.

Work should be done outdoors or in well-ventilated areas, it is best to wear safety glasses and a respirator: chips and sawdust can get into the eyes and lungs, which should be avoided. For the convenience of work, good uniform lighting is also very important in order to see all the details and patterns that are to be cut.
Where to find sketches for house woodcarving for the exterior.
There are a huge number of books in the public domain and in stores where you can find a huge number of sketches and ideas for house carving with photos and examples of the work of craftsmen. No less interesting solutions can be found on the Internet. After the template is selected, it is necessary to fit it to the desired dimensions. You can use graphic editors or do it yourself.

Where to start do-it-yourself wood carving.
A template is cut out of thick cardboard, previously drawn or printed from the Internet. This is, as a rule, a small fragment of a pattern that is repeated many times on a casing or other element of a house. It must be circled with a pencil on a prepared and pre-sanded bar, after which the stencil must be moved and circled as many times as the size of the future decor element requires.
After the “pattern” is transferred to the tree, you first need to cut out the shape of the product, that is, the external contours, then drill holes in future cutouts with a drill and expand them to the desired size and shape with your main tool.

What determines the result and appearance of the product in the technique of house carving? The work is simple, but painstaking, requires patience and accuracy, because the smoother the pattern, the better the result looks. It is important to remember about symmetry: for example, the right and left window trims must be cut in a mirror, all patterns must be at the same height and the same width. In this case, the house will turn out really beautiful, it will be pleasant to look at it and it is impossible to look away.

How to correctly install overlays in their places
Parts must be coated with paint or varnish before they are installed.
There are several types of fasteners for overhead elements. Usually blind dowels are used for this, accurately measuring the distances on the wall and the attached part. In this case, the fastener will not be visible from the side, it is reliable and convenient. There is another option, easier and more convenient: to nail the part with nails. There is a drawback to this method: the heads of the nails will be visible, and they may rust over time. To prevent this, the hats are already in place covered with the same paint as the decor element itself.

A selection of videos on the topic of the article
One of the first mentions of woodcarving can be found in one of the oldest and most widespread of the books. The Bible describes how woodcarving was used in the construction of the tabernacle and the temple. Since then, this type of applied art has not lost its popularity. To this day, many are trying to give their homes an unforgettable look. Beautiful carved wood decorations contribute to this.
Applied art is very diverse. No exception - carved decorations of a wooden house. Sometimes there are such pearls of house-building art that reflect the fabulous beauty and fantastic ingenuity of the authors.

Floral, animal and geometric ornaments are used. Often, stylized images of fairy-tale heroes and incredible creatures born in the imagination of the authors are used as ornamental elements. Domestic scenes are also very popular in the design business.
Despite the many-sided variety of patterns that adorn the facades of houses, there are only a few basic techniques for making such decorations. Here are the main ones:

Very often, masters use several different techniques to realize their idea and make a memorable piece.
Template making
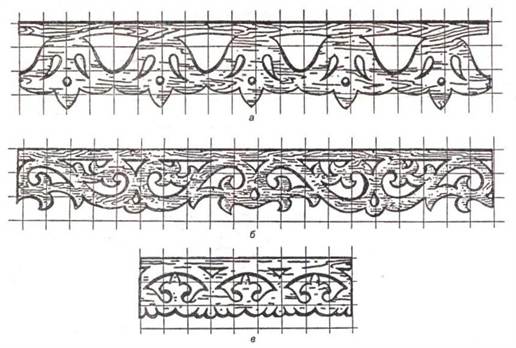
 A careful examination of the decorative design of various house buildings leads to the conclusion that many elements are repeated dozens or even hundreds of times. To facilitate the marking of such ornaments, special stencils are used.
However, before they start making stencils, experienced craftsmen do it with a house pattern. To make this easier, each master collects a personal file of templates for such patterns.
The search for interesting solutions is a continuous process: any master constantly replenishes his collection with new sketches or photographs. This requires observation, because a good pattern can be found in the most unexpected places: while walking or traveling somewhere, while viewing or reading a book, magazine, newspaper, and so on.
Having chosen a suitable pattern for woodcarving for a platband or cornice, they usually start making a template. To do this, take a few simple steps:
- Enlarge the drawing to the desired size. To do this, you can use a computer or a simple "old-fashioned" way, drawing a sample into squares and manually enlarging the drawing in squares.
- The drawing is applied to thick cardboard or thin plywood.
- Cut out the stencil. At the same time, it is important to take into account that the template is a single whole, so they think in advance where to leave places for attaching drop-down parts.
 Making templates greatly facilitates the marking of the entire ornament. In addition, this operation eliminates many problems with frequent errors that occur if you draw each element separately without a template.
Another important advantage of using stencils in house woodcarving is when overlays must be perfectly symmetrical. Without a template, drawing such an element takes a lot of time and does not always work, but with a template, it is enough to turn it over to the other side and you get perfect symmetry.
For example, to draw a fabulous feather of the Firebird, symmetrically diverging in its tail, it is enough to make a stencil of half of the element. After that, you can draw perfectly symmetrical feathers, no matter how many intricate curls it may have been invented.
Scheme of work
 Having made a sketch and the necessary stencils, the novice master can not wait to move on to do-it-yourself wood carving, but for successful work to prepare a workplace.
It should be a spacious room with good lighting and ventilation. Since work is to be done with flammable materials, compliance with fire safety rules is of particular importance.
The tool must be serviceable and sharp. If electrical appliances are used, then the electrical safety rules will help to avoid many problems that arise when they are violated. Before using such tools, their reliability, insulation, grounding, if provided in accordance with the instructions for use, is checked.
Having prepared the workplace and tools, the craftsmen get to work. Sequential basic scheme of such works:


Following a simple step-by-step scheme, very soon any novice master will get used to doing everything right. The created works will delight with their beauty not only the owners of the house, but also those who admire wooden creations from the outside.
House carving is a beautiful and practical solution for interior and exterior decoration. The carving was intended to decorate your home outside and inside with the help of carved items. With the help of a carved facade, you can make your home festive. All protruding and overlaid elements of the facade of the house were decorated with carvings: cornice, architraves, chapels, porch pillars, roofs.


Varieties of technology
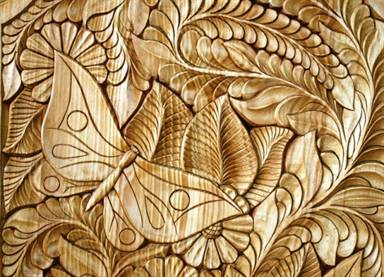
There are such types of house carving: embossed, flat-relief, contour, slotted. If you need to decorate a table, mirror frames, a wardrobe, you should choose a blind relief carving. It has the appearance of a relief pattern and is performed on a dull background. When performing, floral ornaments, images of mythological creatures and animals are used. In the photo it looks like this:

Flat-relief carving is a “relief on a plane”. It is characterized by a deepening or selection of the background around the ornament by 5-7 mm. The image will be voluminous. In the technique of flat-relief carving, compositions depicting people, birds and animals look great. This type is very popular for bathing themes.

Contour carving is characterized by a contour outline of images. This is one of the simplest types of carving. It is used to decorate dishes, cutting boards, household items. In contour carving, pictorial motifs are used: flowers, leaves, animal figures.

Slotted carving (openwork) was used to decorate railings, stairs, architraves, doors, etc. This is the youngest type of carving, which is about 150 years old.
Operating procedure
- Preparing a rough sketch of the house;
- We calculate the required amount of material, select the type of material and prepare the boards of the desired size;
- We make the necessary templates for house carving. To do this, you should think carefully about the ornament, the elements of the composition must certainly be repeated;


- Prepare machines for carving.

It is impossible to start carving without getting acquainted with its technique. You need to start with the execution of geometric patterns.
Templates can be made by the master to order. For this, your sketch, drawing or photo is provided. Many craftsmen make tape stencils for carving on their own.


Template making
Ready-made templates are used for the manufacture of platbands. They can be found freely available on the Internet. You can make a template yourself if you could not find the right option:
- We select a suitable drawing;
- We transfer the contours of the pattern to the tracing paper. To do this, use a ballpoint pen or a soft pencil;

- If you need to enlarge or reduce the picture, use the grid. We transfer the contours to tracing paper. The image field is divided into squares and each is numbered. On a cardboard sheet or thick paper there should be the same number of squares with larger or smaller sizes. The selected image needs to be redrawn into a new grid;
- With the help of carbon paper, the drawing is transferred to a wooden blank.
The template can also be made from plywood.
Features of the method
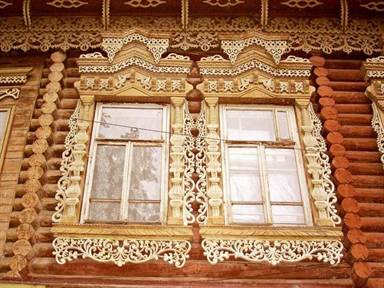
If we drive through the Russian hinterland, we will definitely see overhead elements of house wood carving on the facades of houses. Since pagan times, there has been a tradition to decorate the exterior with carved patterns. Today, it has regained relevance.


Russia has always been famous for its timber reserves and its forests. Therefore, most of the houses and outbuildings were built from high-quality wood, and many such houses still stand today.

Do-it-yourself woodcarving at home occupied an honorable place in Russian folk art. In the Russian hinterlands, you can see a large number of houses, the facades, windows and walls of which are decorated with beautiful patterns and ornaments. Now this type of craft is becoming popular. How to learn the art of woodcarving with your own hands?
Carved decorative elements made by hand
House carving is one of the most ancient types of woodcarving. The craft originated on the banks of the Volga, when architects began to decorate the bow of the ship. They depicted the animal and plant world, as well as symbols associated with the water element. Therefore, house carving is often called ship carving. Russia has always been rich in forests and large stocks of timber. Therefore, huts and residential buildings were most often built of wood. Some of these houses have survived to this day.
Since the texture of wood makes it easy to process it, even the simplest peasants decorated their houses.
By the complexity and size of wooden lace and ornament, one could judge the status and financial situation of the family.
 Making a carved knife handle
 At the beginning of the 19th century, Russian men of the Middle Volga region, having learned from shipbuilders, began to decorate the roofs of houses with patterns, namely skates. Then this type of creativity became more popular, and the craftsmen directed their work to decorating the platbands around the windows.
House wood carving at that time was a very laborious and difficult work, since men did the work with their hands using axes and chisels. And the results of creativity were large-scale, which further complicated the process of creating unique masterpieces. For material, they used only durable and hard woods, such as pine and spruce, which for many years could withstand harsh winters and sweltering heat.
 Making a carved wooden cup
 Since the architects were strong village men, there were real legends about them. During work, they had fun: they sang and joked, driving away longing. The craft developed rapidly.
Masters began to decorate with carvings not only shutters and doors of houses, but also railings, gates and gates. In addition to patterns, they created a kind of amulets for the family living in the house. Most often, these were images of smiling mermaids. Such amulets decorated windows and doors and were supposed to protect the family from evil spirits. 
In the middle of the 19th century, ship carving became so popular that architects began to decorate furniture, watch cases, and mirror frames with drawings. Masters could depict various plants with bizarre leaves and flowers that intertwined with each other, fantastic animals and other mythical characters against a dull background.
It could also be openwork abstractions without specific patterns. The technique and patterns of lace, enriched by tradition, have been passed down from generation to generation.
 An example of a pattern of carved platbands for a house
 House carving has become an integral part of dwelling architecture in Russia. Modern creativity has lost its magical meaning, but the ornament has not changed much over so many centuries.
Thread types
The craft began to combine various areas of creativity and methods of applying wooden lace. Gradually, the ornaments and the technique of drawing images became more complicated. The main types of house carving:
- deaf or embossed;
- voluminous or sculptural;
- slotted or openwork.
It is a technique in which drawings and patterns are applied to a solid background. Vegetative, zoomorphic and anthropomorphic ornaments served as motives. Most often, these were images of a vine with a large number of plexuses, mermaids, beautiful leaves, birds and animals. 
These objects were used to decorate the pediments of the houses, the architraves around the windows and the end boards. In earlier times, blind ship carving was a geometric carving that carried drawings of geometric figures. For example, these were circles with rays rising from it, reminiscent of the sun. Or rhombuses, triangles and pyramids, which were repeated many times over the entire surface of the image. The roots of the patterns go back to paganism, when various figures were used as the strongest amulets, carrying magical power.
Read also
Methods of artistic woodcarving
Now relief carving is divided into two subspecies:

Currently, blind embossed woodcarving is widely used to decorate furniture: doors, chair backs. This type of creativity is used to create wall panels for interior decoration.
Sculptural and slotted carving
Volumetric or before it turned into house carving, it was used to decorate the bow of ships. Then volumetric objects moved to the roofs of houses, when the craftsmen began to decorate the ridges of the roofs.
The result of sculptural carving is a three-dimensional image, which is completely or partially separated from the background. The drawings that were used in sculptural carving were at first birds or animals, mythological characters.
 Figurine made by sculptural carving
 Then, when Christianity came to Russia, saints were depicted from wood, which were brightly painted and decorated with temples. At that time, wooden toys were very popular throughout Russia. Craftsmen from Zagorsk and the village of Bogorodskoe are widely known for their masterpieces made of wood.
In their crafts, they embodied humor, jokes and satire. And the architects of the Kostroma, Nizhny Novgorod and Yaroslavl provinces depicted birds on the tree, which were symbols of a good start. Sculptural carving is a carved object, there is also a patterned surface treatment of the product, which imitates the plumage of birds or animal hair. This type of carving was used and is used to decorate furniture and interior items. 
Volumetric sculptures, such as animal paws or mythological birds, adorn the armrests of chairs, railing elements and balconies.
Welt carving looks like an ornament or patterns that do not have a background. It is also called openwork, because it looks like lace. Openwork house carving can be done in two styles:
- flat-relief - drawings have a flat surface;
- embossed - convex patterns.
Slotted carving was widely used both in decorating dwellings from the outside, and for decorating various furniture. So, openwork patterns were a kind of amulet on window trims and over doors, they decorated the cornices on the porches and railings on the stairs, decorated the gables of houses, striking with their beauty.
 Pattern made by flat-relief carving
 Architects from the Russian north, who learned the highest degree of craft, were distinguished by a special skill in the manufacture of wooden lace.
To make openwork patterns, craftsmen had to remove the background with a chisel or saw. Now this process has become much easier, since woodworkers use an electric jigsaw. In the serial production of furniture, the removal of an unnecessary background occurs mechanically using special equipment.
House carving is a way of decorating a home by carving various ornaments, patterns or figures on wooden structures. The traditions of such decoration are rooted in the deep past - scientists believe that carving originated among the ancient Slavs around the 10th-11th century. Masters decorated all the protruding elements of housing - balusters, porch, wind boards, roofing, cornices and architraves. Woodwork was carried out with the simplest tools, protective runes were applied to the boards, scaring away evil spirits and inviting well-being into the house, images of the gods and the surrounding nature, symbols of rain and sun. Runes and symbols served as amulets, protecting the house space.
With the introduction of Christianity in Russia, their magical and incantatory function was lost, and house carvings began to be used exclusively for decorative purposes. But even today, ancient symbols and runes are visible in ornaments and patterns - rows of triangles and semicircles, symbolizing rain and heavenly moisture, images of animals and trees, fields and forests. With the help of carving, you can decorate your home, give it a decorative and complete appearance, returning to the traditions of your ancestors.
The procedure for performing work in the workshop "Carved Business"
In the past, craftsmen had to make decorative elements by hand, which was associated with high labor costs and the process dragged on for several months. Today, overlays are created on a modern machine with numerical control, and cuts are made using a laser. This technology has serious advantages: planks and overlays are identical, and cutting wood pores are sealed from high temperature and slightly charred (additional protection from moisture). In addition, now there is no need to wait for manufacturing for several months - it takes 2-3 days to make platbands in a wooden house of a classic size, depending on the complexity of the work.


