Printing a document to a printer from 1s. Publications
Most of the training materials on programming in the 1C system when describing the formation of printing forms based on an object "Spreadsheet Document" are limited to displaying the finished form on the screen. For users, what is much more important is how the document will look when printed. Here, in addition to a well-designed layout, print settings also play a role.
Almost all parameters available in the print settings dialogs (printer settings, page properties) can be specified directly when creating a spreadsheet document.
Let's consider the properties and methods of a spreadsheet document related to print settings (in the examples given, "TabDoc" is an object of the "Spreadsheet Document" type).
Property "PrinterName" allows you to specify a printer other than the default for printing. The name must match the printer name set on the system:
TabDoc. PrinterName = "HP LaserJet 3050 Series PCL 6";
When printing a batch of documents, you can save time by setting the collation flag:
TabDoc. CollateCopy = true;
The number of copies can be specified like this:
TabDoc. Number of Instances= 5 ;
Of course, you can set the fields:
TabDoc. MarginLeft = 20 ; // Left margin 20mm, other margins 10mm (default)
A few more page properties:
TabDoc. OrientationPage=
OrientationPage. landscape;
TabDoc. InstancesOnPage=
2
;
//sheet will have 2 pages
TabDoc. Autoscale = true; //similar to the scale settings "according to the width of the page"
If necessary, you can specify a specific scaling value in percent (property "Print Scale").
Property "Page Size" allows you to set standard page formats - “ A3”, “A4”, “A 5” (full list options is available in help 1C).
TabDoc. PageSize = "A3" ; // letter A must be English
For custom paper size (Custom), you can specify page height and page width (in mm):
TabDoc. PageSize = "Custom" ; //custom size
TabDoc. PageHeight = 350 ;
TabDoc. PageWidth = 350 ;
Also in the spreadsheet document, you can control the output of headers and footers and their contents. For this, the properties "Page header" and "Footer". For example:
TabDoc. Page header. Output = true; //header will be printed
TabDoc. Header SizeTop=
7
;
//footer size 7mm (default 10mm)
TabDoc. Page header.
vertical position=
vertical position. Top ;
TabDoc. Page header.
Start page=
2
;
//footer is displayed from the second page
FontHeader and Footer=New Font("Courier New" , 8 ,True);
TabDoc. Page header. Font = FontHeader and Footer;
// italic font
TabDoc. Page header. TextInCenter = "Page header";
TabDoc. Page header. TextRight = "Page[&PageNumber] of [&PagesTotal]";
//pagination
TabDoc. Page header. TextLeft = "[&Date]" ; //The current date
The generated document is sent for printing using the method "Type()". There are two call options.
1) Directly to the printer:
TabDoc. Print(.Don'tUse);
TabDoc. print(true);
2) Before printing, a print dialog will be displayed:
TabDoc. Print ( ModeUseDialogPrint. Use );
TabDoc. print(false);
In addition, you can control the pagination of the document. You can estimate the number of pages in a document using the current printer settings as follows:
TabDoc. Number of pages();
With methods "CheckOutput()" and "Check Attach()" you can determine whether a spreadsheet document or an array of spreadsheet document areas fit on the page in both height and width at the current printer settings.
Keep in mind that the work of the last three methods depends on the installed printer. If the method cannot find it, an exception is thrown.
Forced insertion of page breaks allow methods"Output VerticalPage Separator()" and "OutputHorizontalPageSeparator()".
Thus, it is possible to control page output for printing and control page filling:
If Not TabDoc. CheckOutput( Array Of OutputRegions) Then
TabDoc. OutputHorizontalPage Separator();
EndIf;
An important characteristic of the 1C:Enterprise 8.2 platform is the strict separation of properties and methods according to the execution context. If all of the above properties are available in any context, then the listed methods are not available on the thin client. The exception is the "Print()" method, the availability of which, for obvious reasons, is limited to the client side. This means that the formation of a spreadsheet document must occur on the server, and it should be sent for printing in the client procedure.
Consider how documents are printed from 1C applications operating in service mode (via the Internet).
Both in the local version of the application and in the service, the same document can be printed in different versions. For example, an invoice can be printed both in the form of a regulated consignment note (TORG-12) and, in fact, in the form of an invoice (for the internal needs of the organization). Therefore, before printing a document, in the form of a document, you must select the desired type of printing. This can be done from the drop down menu. Seal(as shown in Fig.1 for an example application "1C: Managing our company").
Rice. one.
Start printing
In some applications (for example, "1C: Accounting 8"), if only one printable form is provided for the document, then you can start printing in one click (in this case, instead of the menu Seal a button with the name of a single printable is displayed).

Rice. 2. Printing documents with a single printable
Since printing documents in service mode starts in a browser window, pay attention to the following printing features.
- Print confirmation usually needs to be done twice: first in the 1C: Enterprise print form, and then in the corresponding browser form (Fig. 3).
- Possibilities of editing printable layouts by the user in the service mode are limited. If you want to use your own printable (for example, with your company logo placed on it), you can do this by uploading a standard printable from the service, editing it in the local version of the application, and uploading it back to the service (more detailed information about using custom printables, see ).
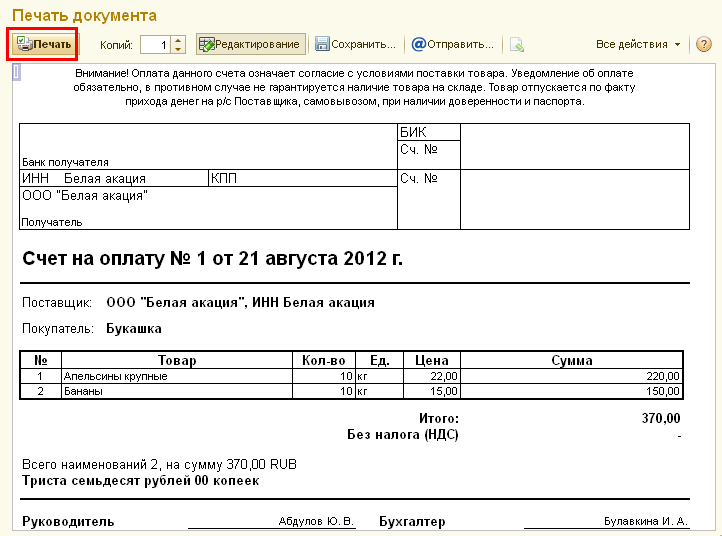
Rice. 3.
The printed form of the document
The interface of document printing forms is different in different browsers. Therefore, if you use not one, but several browsers to work in the service, be prepared for the fact that the usual workflow when printing will differ slightly, depending on the browser used and its version. For example browser Google Chrome offers in an additional dialog box issued immediately before printing, to carry out preview and set print settings (Fig. 4).

Rice. four. Printing a Document in the Google Chrome Browser
If you want to use your own printable (for example, with a logo placed on it), then you can do this by downloading a standard printable from the service, editing it in the local version of the application and uploading it back to the service (for more information about using custom printables, see find ).
Print order
Let's give a general sequence of actions when printing documents (Fig. 5).
- Start printing by clicking the appropriate button on the document toolbar and selecting the desired print form from the menu (see Figure 1).
- In the printed form that opens, define the available options (for example, the number of copies).
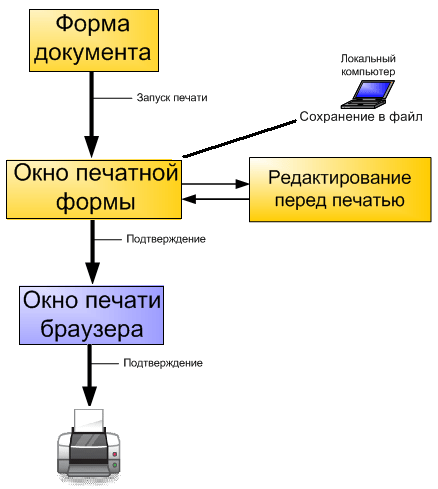
Rice. 5. Printing sequence
- If necessary, edit the text in the printed form. To do this, double-click on the desired form cell and change the text in it (Fig. 6).

Rice. 6.
Editing a printable
- If you want to save the finished printed form of the document to a file on your local computer, click the button Save in printed form (see Fig. 3), select in the dialog box that opens Saving a printable desired file format by checking the box next to it, and click the button Save c (Fig. 7).
Note: You can set several formats at the same time - in this case, several files with the appropriate extensions will be created.

Rice. 7.
If desired, save the file in the desired format
- Click the button Seal in the printable window (see Fig. 3).
- In the browser print window that opens, if necessary, select the print options (printer, etc.) and click the button Seal again (Fig. 8).
As a result, the document will be printed on the printer.

Rice. eight.
Starting Printing Using the Browser System Dialog (Used Internet Explorer)
FAQ
1. What is the printing method? What is the best printing method?
The printing method is selected in the 1C:Enterprise settings available on command Main menu / Tools / Options(Fig. 9).
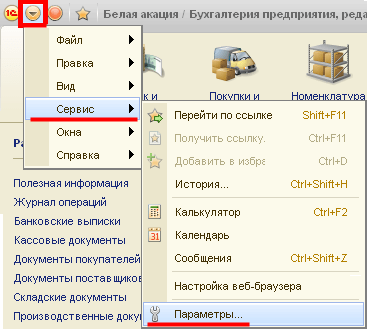
Rice. 9. Main menu 1C
Parameter Print method(Fig. 10) determines the degree of user influence on the layout of the document:
- PDF- printing without changing margins and scale;
- HTML- when printing, changes in margins and scale are possible.

Rice. ten. Selecting a Print Method (recommended) PDF )
2. How to configure print settings?
1C:Enterprise print settings are available in the form of a document using the command (Fig. 11).

Rice. eleven. Choosing page options
Since web browsers have their own print settings, they need to match the Spreadsheet Document Breakdown Page settings mentioned. Browser print page settings are edited in the dialog Page settings(Fig. 12), which in Microsoft Internet Explorer, Mozilla Firefox and Apple Safari is invoked by the browser menu command: File / Page Setup...(File / Page Setup...). There is no such setting for the Google Chrome web browser.
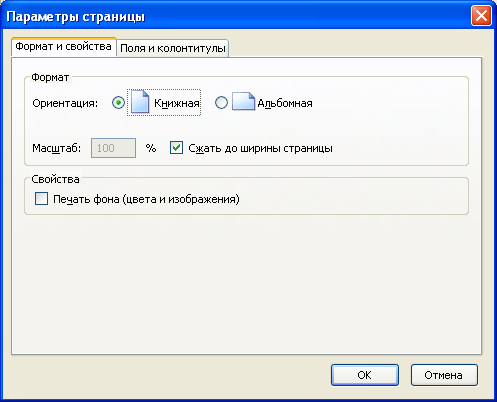
Rice. 12. Selecting page options in the browser
3. Can I preview a document before printing?
To make sure that the spreadsheet document will be printed correctly, you can use the print preview.
- When using the web browsers Microsoft Internet Explorer, Apple Safari and Mozilla Firefox (in most versions), the preview is opened by the browser menu command: File / Preview(File / Print Preview).
- For the Google Chrome web browser, a preview is performed by default immediately before printing (see Figure 4 above).
Common Printing Mistakes
1. What should I do if a page is output to the printer with errors when printing?
Check that as Printing Method(Main Menu / Tools / Page Options) option selected PDF. Then, if the errors persist, check that the 1C:Enterprise print settings are correct ( Main menu / File / Page setup- these settings should be called from the window with the printed form of the document, as shown in Fig. 11) and browser print settings (Fig. 12), which are available when you select the command File / Page Setup.
2. What should I do if I am prompted to save to a PDF file instead of printing to a printer?
In some browsers, if there are no connected printers, the default mode is to print to a PDF file. If this happens, check that the printer is connected and correctly installed in the operating system.
For more information about printing, see the article on the ITS website.
We wish you pleasant work!
Each electronic document 1C can be printed on paper and this is done using 1C printing forms. Printables are made up of named blocks, such as Header, Row, and Footer.
How to make a printed form is already clear. How to break it into blocks - too. But how does printing work in 1C of this whole thing? And especially - how to display not just the text of the layout, but the contents of the electronic document?
This is what we're looking at right now.
Preparing a layout for printing in 1C
To begin with, you will have to start with the simplest and fill in the layout for printing in 1C with static text and table lines. After all, someone has to do this boring job?
We place static text for printing in 1C
To begin with, it would be nice to place the name of our printable. Select several cells in a row, and select the menu item Table/Merge. As a result, several cells will be merged into one.

Now in this cell we will write the name of the document. Since this is a heading, we probably want to make it a bold large font (see picture) and place it in the middle.

We place the design of the layout for printing in 1C
We have a named area String. In it, when printed in 1C, each row of the Goods document table will be displayed. Probably we would like the table to look like a table when printed in 1C? Then you need to draw borders for it.
To do this, select the cells of the row and select the Borders button on the panel. We chose the Border everywhere option - it draws cell borders from all sides at once. If you need to limit yourself to only one side, then you need to select the appropriate button.

To make the lines used to draw the borders different from the standard ones, select the cells and right-click. In the menu that appears, select Properties.
In the familiar properties window, you can select the type and color of lines for drawing borders.

We place pictures and other tinsel for printing in 1C
Many people ask - how to place something other than text on a 1C printed form? For example, a picture.
And it's very simple. Moreover, I will say right away that the barcode (if you need to print it) is also a picture.
Put the cursor on any cell. Select the menu Table/Figures. This is a whole submenu that allows you to insert not only a picture or a drawing object into a layout for printing in 1C, but also objects from outside 1C, registered on a computer using a COM class (for example, a drop-down list control).
For those who are interested in creating complex designs for printing in 1C on a layout, also look at the drop-down menu Table / Print settings. Here you can set the repetition of the area on each page, headers and footers and the print area.
How to place the contents of an electronic document when printing in 1C
To place on the layout when printing in 1C the contents of an electronic document, the substitution method is used. It consists of two parts.
Part one. It is necessary to place on the layout the parameters into which you will substitute the values when printing in 1C.
Put the cursor in the cell. Enter the name of the parameter (in a word, without spaces and other garbage). Next, let's enter the properties of this cell (as mentioned above) and select Filling = Parameter.

Part two. Value substitution is performed not when you are programming in the configurator, but at the time of printing the document in 1C. Accordingly, using programming, you need to specify 1C what needs to be substituted into this parameter.
This is done as follows:
Layout = GetLayout("LayoutName");
regionWhat = Layout.GetArea("AreaName");
regionSome.Parameters.ParameterName = "What I want to substitute from the database";
As you can see, we simply get the layout itself by name, then one of its areas, and then we simply refer to the parameter by its name.
Naturally, the value can be either a string or a number, or the value specified in the document.
How to print a layout in 1C
After the layout is ready, it's time to think about programming the printing process in 1C.
Printing in 1C is usually programmed with several procedures that are located in the document object module. .
The Print() procedure is usually marked Export and controls the printing of a document in 1C using the LayoutName parameter, which transmits what you would like to print.
For each layout variant, the procedure PrintLayoutName() is made, which specifies the printing of a specific layout. Here we will see it now.
Printing programming in 1C consists of three points.
Before printing an electronic document in 1C, we need to request its data from the database. Obviously, in order to print a document, the user usually "enters" it (opens its form) and presses the Print button. Therefore, in the printing procedure, one could simply refer to the details of the document (what it is - discussed here) by name.
However, this is considered ugly, not universal, etc. For example, suddenly the processing of mass printing of documents will be used (how often is this used?). Therefore, it is customary in the print procedure to make a database query that requests document data. For example, like this:
Request = New Request;
Query.Text = "SELECT
The date,
Number,
Organization
FROM
Document.DocumentName
WHERE
Link = &DocumentToPrint";
Query.SetParameter("DocumentToPrint", Link);
Selection = Query.Execute().Select();
Selection.Next();
Point 2. Filling out the layout for printing in 1C
Printing in 1C is done in a spreadsheet document. This is a special 1C object that allows you to display tables, like Excel, on the screen and print. Naturally, a layout is printed, or rather, its areas alternately.
Accordingly, we first need to get a spreadsheet document, then a layout. We print the areas one by one, filling in the layout parameters.
TabDoc = New SpreadsheetDocument;
Layout = GetLayout("LayoutName"); //or GetGeneralLayout("")
regionHat = Layout. GetArea("Hat");
TabDoc.Output(regionHat);
regionString = Layout.GetRegion("String");
While SelectingDocumentRows.Next() Loop
regionString.Parameters.Item = Selection ofDocumentLines.Item;
TabDoc.Output(regString);
EndCycle;
regionHap = Layout.GetArea("Basement");
TabDoc.Output(RegionBasement);
Point 2. Printing a document in 1C
The last item is the output of the received document to the screen or printer. In typical configurations, a standard procedure is used for this (each may have its own), for example, UniversalMechanisms.PrintDocument().
In other cases, you can simply use the generic functions of the SpreadDocument object: TabDoc.Show() or TabDoc.Print() .
The specifics of the 1C platform, a large number of documents and reports that need to be converted from electronic to paper, problems with equipment compatibility, and just the crooked hands of programmers lead to the fact that 1C printing errors are one of the most common problems.
Duplex printing error 1C
After one of the platform updates, many users are faced with the fact that the printer does not print from 1C in duplex mode. At the same time, not many paid attention to the fact that the Page Settings window has changed in the program (Fig. 1)
In particular, in the lower left corner, the possibility of setting up two-sided printing has appeared. In this case, priority is given to the program settings, and not to the printer's own settings in the operating system. The list of possible values in the first versions of the window accepted only two values: Yes and No, which completely excluded the possibility of using printer settings. After the platform update, four options appeared:
- No (will only print one-sided, regardless of the printer window);
- Flip up;
- Flip to the left;
- Use printer settings.
The last item is currently set as the default to avoid this error.
Default printers and related errors
Very often, errors containing the phrase “getting information about the printer” occur due to the fact that the printers installed by default for 1C are not seen by the program. This can happen in the following cases:
- The terminal mode of operation is used;
- The network name of the printer has changed;
- You have previously printed to a printer that is not currently available.
In any case, the occurrence of such an error has little to do with the 1C program itself, and to a greater extent depends on the settings for network access to printers, user rights to connect and use local devices, and network operation.
Errors when printing related to shortcomings in the code
Often, an attempt to print a particular spreadsheet document fails due to errors in the code. Employees of the 1C company and specialists involved in maintaining the performance of configurations try to identify them at the development stage, but occasionally they pop up.
Such errors include:
It should be noted that although it is unlikely that these errors can be corrected without making changes using the configurator, they are not critical. Full information about them is presented in the service messages window and they are corrected, as a rule, within a fairly short period of time.
Errors when setting up a label printer
Even for specialists who have been working with the 1C application for a long time, it is sometimes very difficult to set up special printers that print sticky labels of certain sizes.
Reinstalling device drivers and other dances with tambourines, as a rule, are not successful.
The sequence of actions that will help to minimize the printer setup time in 1C and save the nerves of a specialist may look like this:

Errors when printing barcodes
Also, quite often, users deal with problems that arise when printing various documents containing barcodes. As a rule, these problems can be reduced to several groups:
- The program component responsible for barcode generation is not installed;
- The barcode type is set incorrectly, or the string passed as a code has an incorrect format;
- Errors in matching the size of the image and the area of the layout in which it should be placed.
In the first case, the problem is solved by installing the appropriate add-on, which can be found on the ITS disk or the official 1C website. The other two options require intervention in the program code, and without special training getting rid of the pop-up error can be difficult.
At the end of the article, I would like to note that errors that occur when printing in 1C in no way affect the initial data in the program and are not critical.


 Scenario of the anniversary of a man of 75 years")
")
